Choose your model
90 Series Land Cruiser High Clearance Rear Bumper Kit
Toyota Land Cruiser 90
Toyota Toyota Land Cruiser 90 CO12797Product ID: 12797
Mandona
There are many variations of passages of Lorem Ipsum available, but the majority have suffered alteration in some form, by injected humour, or randomised words which don't look even slightly believable. If you are going to use a passage of Lorem Ipsum, you need to be sure there isn't anything embarrassing hidden in the middle of text.
Create an account to put this in your wishlist.
Go to wishlistCreate an account to put this in your wishlist.
90 Series Land Cruiser High Clearance Rear Bumper Kit
Toyota Land Cruiser 90
Toyota Toyota Land Cruiser 90 CO12797Product ID: 12797
Ships within 3-10 business days with 2 day shipping
Ships within 3-10 business days with 2 day shipping
Choose
your variation
4.6
( 215 Google reviews)
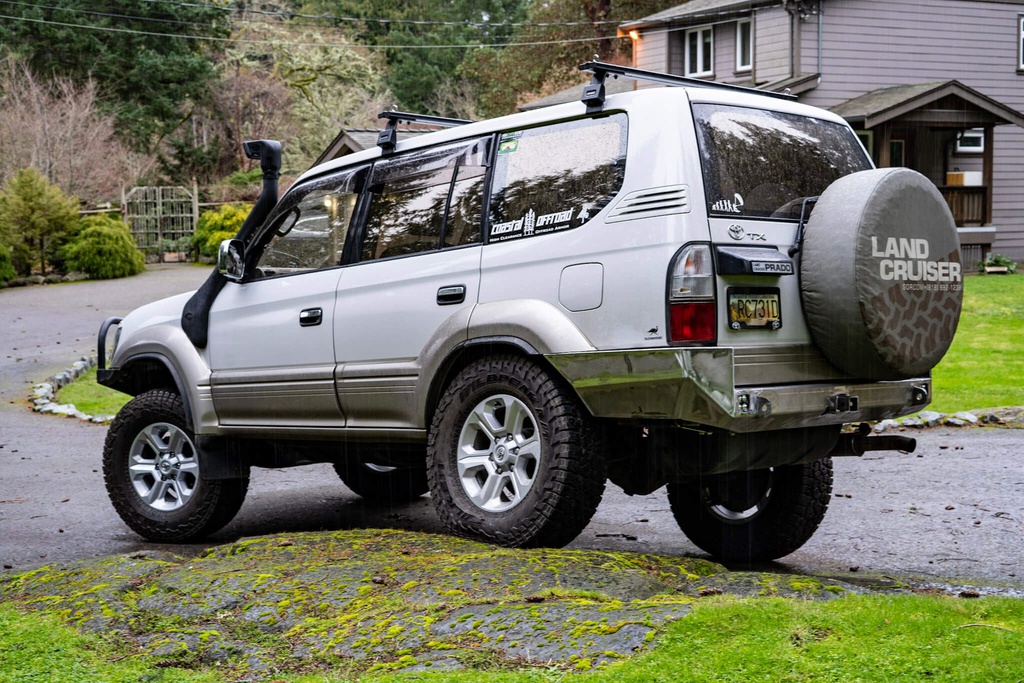
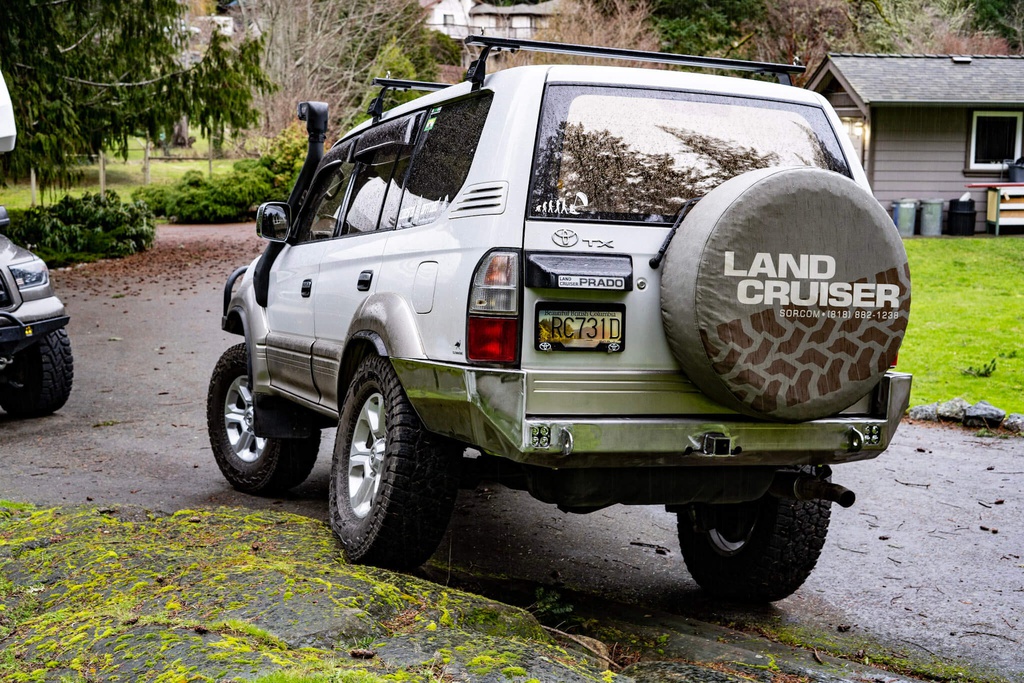
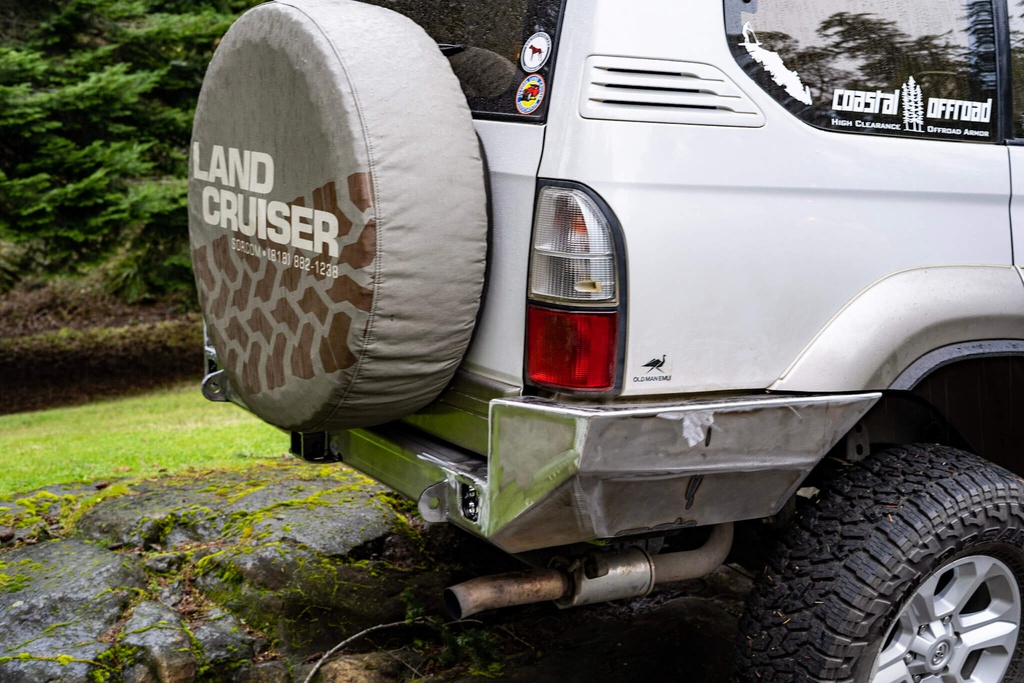
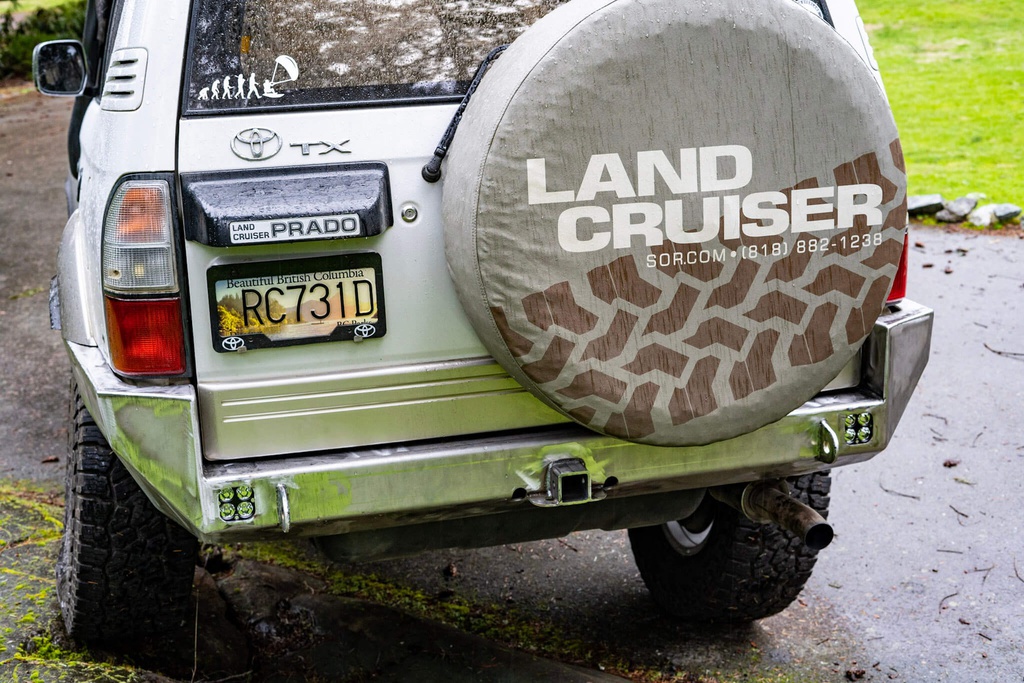
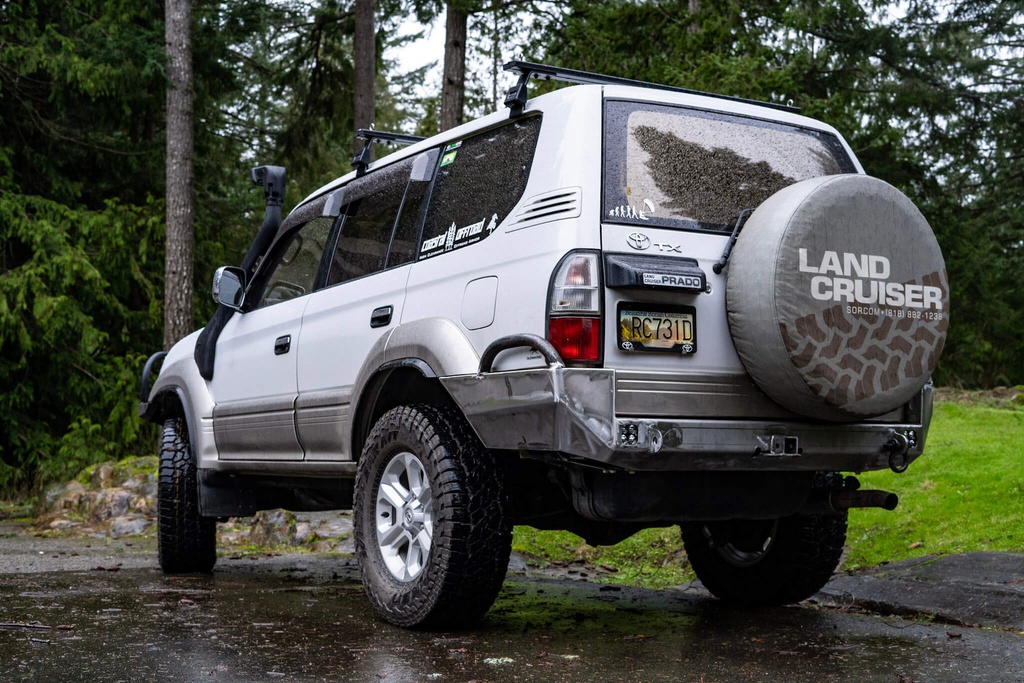
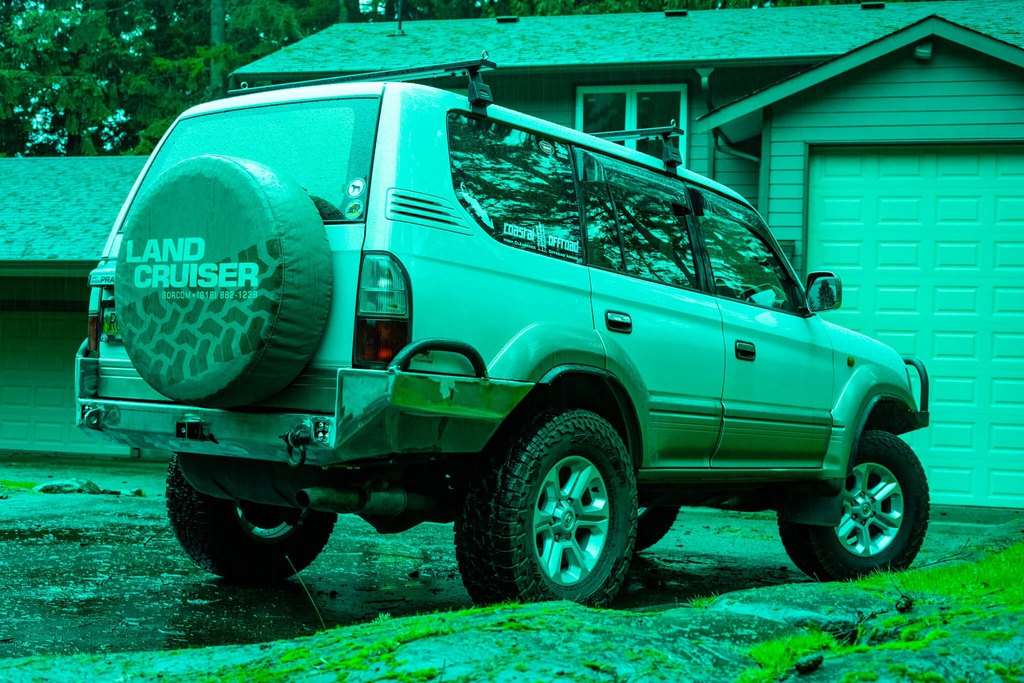
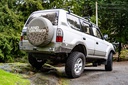
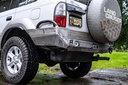
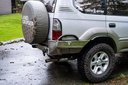
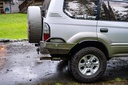
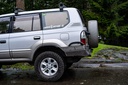
This is a high clearance DIY weld-together rear bumper kit for the (1996-2002) 90 Series Toyota Land Cruiser Prado. It provides total wrap-around protection for the rear of your Land Cruiser and the high clearance design hugs the factory rear crossmember for unbeatable ground clearance and departure angle. Simply put, you can not get any more rear end clearance without cutting the frame and body! This bumper is a direct replacement for the factory rear bumper and also replaces the vulnerable plastic cladding that wraps around the rear corners of the vehicle body. This means that none of the delicate factory plastic is left vulnerable to obstacles on the trail.
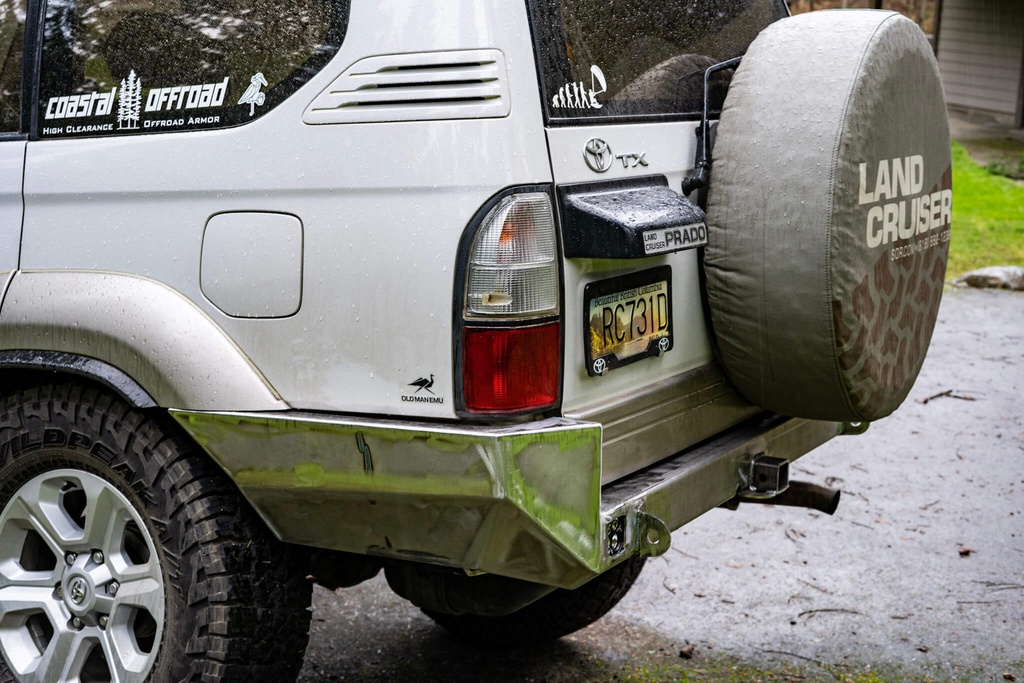
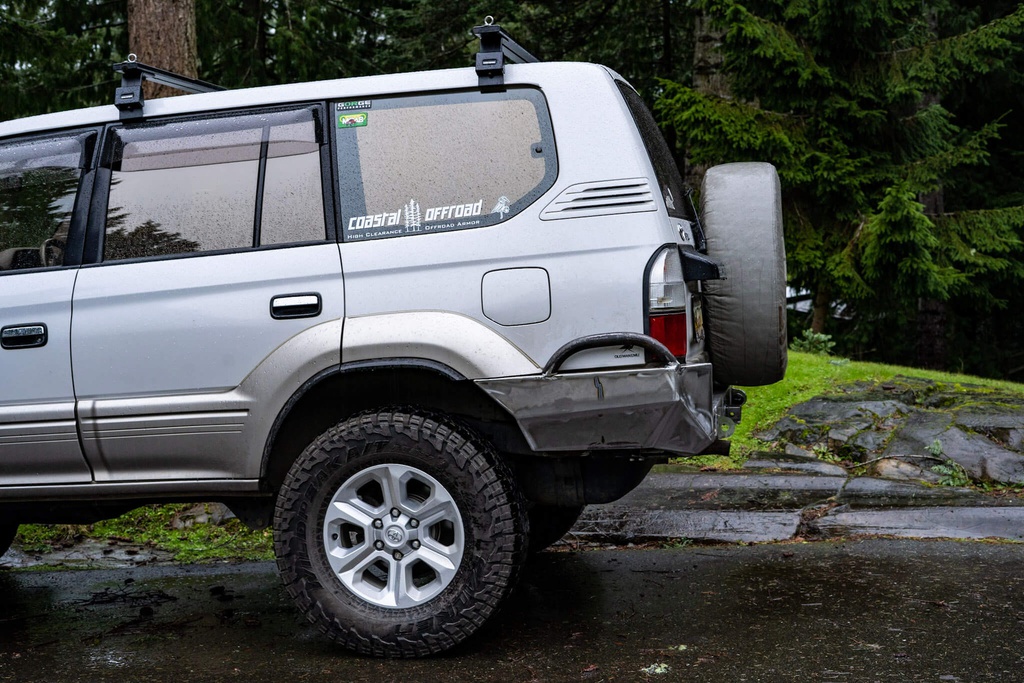
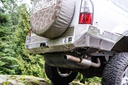
The profile of this bumper has been designed with maximum ground clearance and departure angles put first. The bumper sits as high and tight to the rear frame crossmember of the 90 Series Land Cruiser Prado as possible, while the angled side wing faces will smoothly slide over obstacles and ensure you do not get hung up on the trail. The side wings of this bumper provide un-interrupted plate protection that wraps underneath the vehicle and into the vehicle frame. These side wings will take a serious hit without flexing or deflecting into the vehicle body. We know that many Toyota Prado owners want to run oversized tires, which often create interference and rubbing issues with the stock bumper. We have thought ahead and specifically designed these bumper side wings to clear 37″ tires at full suspension compression.
The main section of this bumper is CNC-bent out of a single piece of 3/16″ P&O Steel. This greatly reduces the amount of welding and grinding required by you and makes for a cleaner finished product. If you are paying to have the bumper assembled by a welding shop, this significantly lowers the cost.
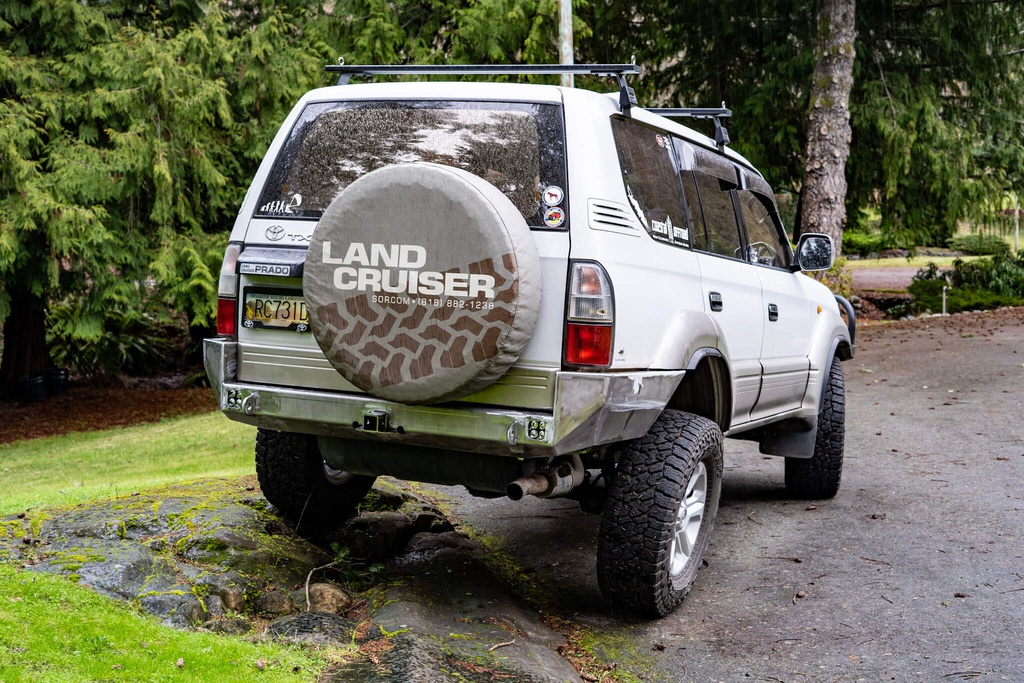
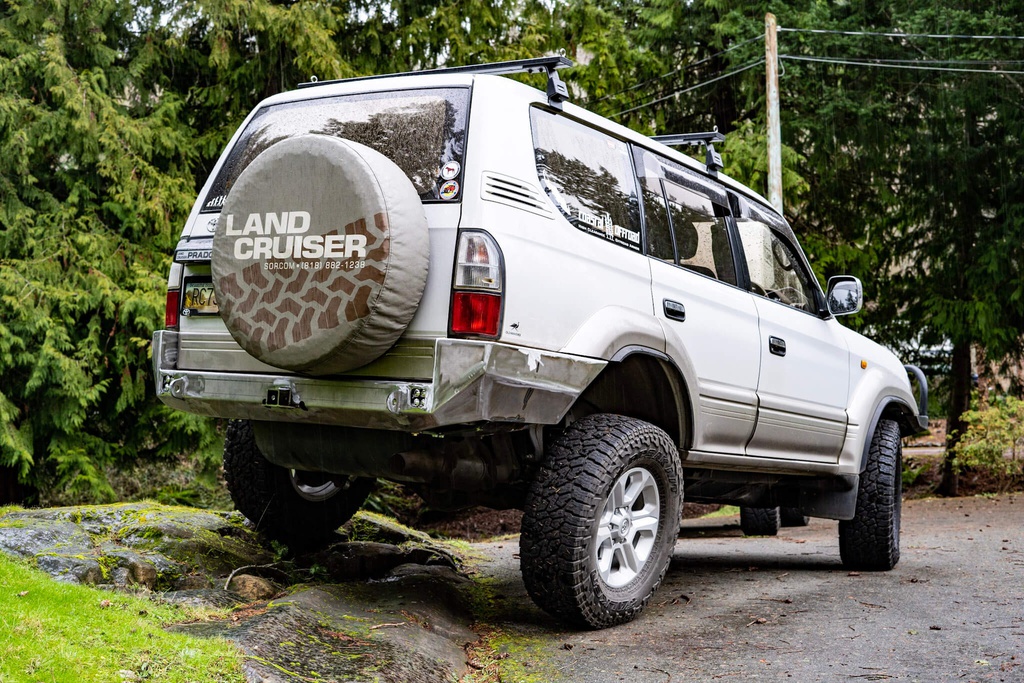
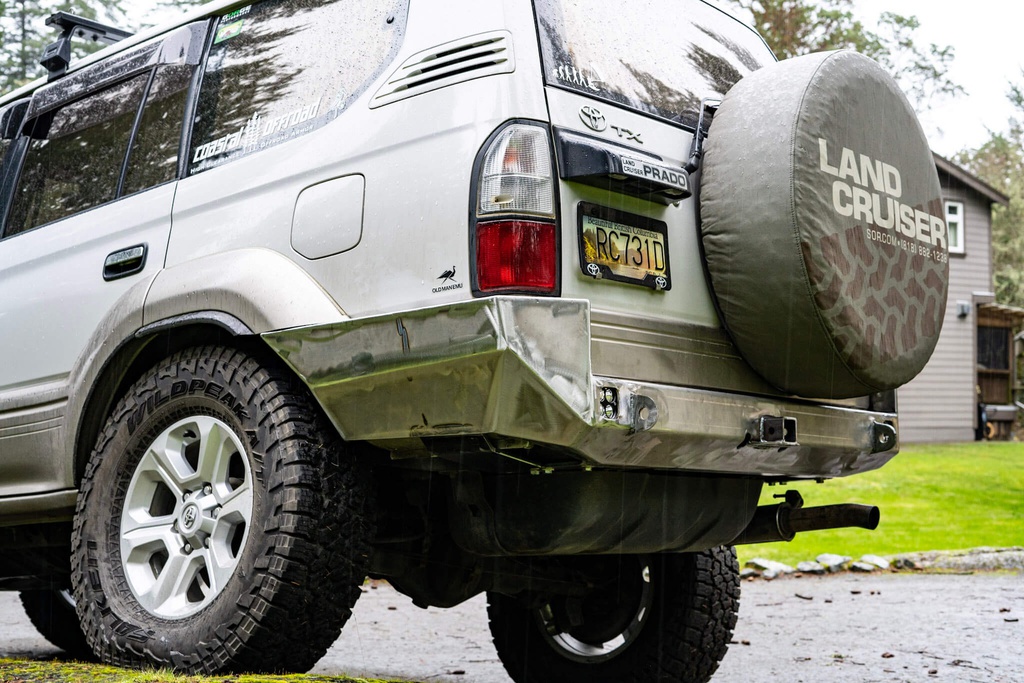
The bumper comes standard with 3×3″ LED pod mount light cut outs that sit just outboard of the recovery points, giving them a much more effective light spread as well as keeping them out of harms way. This includes adjustable slotted mounting tabs that are integrated into the interior of the bumper behind each light opening, allowing for tons of adjustment to fit a wide variety of lights. We can also do custom light cut outs by request. To protect the vulnerable and irreplaceable rear quarter panels of your Land Cruiser Prado, this bumper is available with optional tubing side hoops that help push your Prado away from trees and other obstacles.
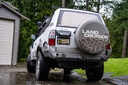
We finished this bumper off with optional single and dual swing out carriers, a high clearance hitch receiver and heavy duty 9/16″ recovery points that are placed directly in line with the Toyota Prado 90 frame to eliminate any leveraging effects. These recovery points are formed out of laser cut steel plates that pass through the bumper shell and tie directly into the bumper’s main mounting points on the Toyota Prado frame. The recovery points then get welded to the in and outside of the bumper shell. These factors all combine to form recovery points that minimize stress on your Toyota Prado frame and provide reliable recoveries of heavily loaded vehicles in the worst of offroad situations. This bumper comes at very reasonable weights of 112lbs for the steel bumper and 55lbs for the aluminum version. Considering that this bumper replaces your factory bumper, hitch receiver and associated components, the resulting weight increase to your Toyota Prado is surprisingly minimal. This reduces added stress on your vehicle, maintains precious payload capacity, and allows you to keep your factory suspension if desired.
The swing out tire carrier comes in either a single or dual sided configuration and is built to accept a tire up to 37″ in diameter! Both carriers include mounting brackets for a hilift jack and other recovery items. The dual swing out includes the hilift mount as well as a lockable jerry can holder designed to fit two 20L NATO style jerry cans. These carriers feature heavy duty chromoly heim joint hinges, 2000lb toggle latches, T-handle spring pins, and a replaceable UHMW catch pad that provides secure, rattle free operation. The heim joints in conjunction with the toggle latch provide tons of adjustability, allowing for easy assembly and guaranteed alignment of the carrier latch. The single swing out add-on weighs 34lbs and the dual swing out add-on with gas can holder weighs 77lbs.
•DIY Weld-together kit – This bumper arrives as precision CNC-laser cut and bent pieces that you then weld together (detailed assembly instructions included)
•CNC-bent plates greatly reduces amount of welding and grinding required by you and makes for a cleaner finished product
•Engineered to provide maximum ground clearance and protection while also complementing the factory body lines
•Heavy duty 3/16″ plate steel construction for maximum offroad strength and durability
•Optional 1/4″ 5052 aluminum construction for a lightweight yet very durable overlanding setup (57lb weight savings)
•Wrap-Around Side Wings – The side wings of the bumper wrap all the way to the rear wheel wells, removing all vulnerable factory plastic parts
•2″ hitch receiver is recessed into the bumper shell for a clean look and further clearance gains (While the hitch is very well reinforced, we cannot rate it for on-road towing due to the DIY welding nature of this kit)
•Mounts to the frame using 12 mounting points
•Reinforced 9/16″ thick clevis mounts allow the use of 3/4″ D-Rings and pull directly off of the frame for confident recoveries of heavily loaded vehicles
•All kits ship as clean, bare metal that is ready to weld out of the box – the Nitrogen laser cutting technology means no cutting edge oxidation and thus easier and stronger welds
•Optional Single and Dual Swing out carriers with spare tire mount, hilift jack mount and locking dual NATO can holder (dual swing out only)
•Integrated LED light mounts in the bumper include slotted mounting tabs that give tons of adjustment to fit a variety of lights


90 Series Land Cruiser High Clearance Rear Bumper Kit
Toyota Land Cruiser 90 Toyota
AUD$ 1,162.92Product ID: 12797
Product overview
This is a high clearance DIY weld-together rear bumper kit for the (1996-2002) 90 Series Toyota Land Cruiser Prado. It provides total wrap-around protection for the rear of your Land Cruiser and the high clearance design hugs the factory rear crossmember for unbeatable ground clearance and departure angle. Simply put, you can not get any more rear end clearance without cutting the frame and body! This bumper is a direct replacement for the factory rear bumper and also replaces the vulnerable plastic cladding that wraps around the rear corners of the vehicle body. This means that none of the delicate factory plastic is left vulnerable to obstacles on the trail.
The profile of this bumper has been designed with maximum ground clearance and departure angles put first. The bumper sits as high and tight to the rear frame crossmember of the 90 Series Land Cruiser Prado as possible, while the angled side wing faces will smoothly slide over obstacles and ensure you do not get hung up on the trail. The side wings of this bumper provide un-interrupted plate protection that wraps underneath the vehicle and into the vehicle frame. These side wings will take a serious hit without flexing or deflecting into the vehicle body. We know that many Toyota Prado owners want to run oversized tires, which often create interference and rubbing issues with the stock bumper. We have thought ahead and specifically designed these bumper side wings to clear 37″ tires at full suspension compression.
The main section of this bumper is CNC-bent out of a single piece of 3/16″ P&O Steel. This greatly reduces the amount of welding and grinding required by you and makes for a cleaner finished product. If you are paying to have the bumper assembled by a welding shop, this significantly lowers the cost.
The bumper comes standard with 3×3″ LED pod mount light cut outs that sit just outboard of the recovery points, giving them a much more effective light spread as well as keeping them out of harms way. This includes adjustable slotted mounting tabs that are integrated into the interior of the bumper behind each light opening, allowing for tons of adjustment to fit a wide variety of lights. We can also do custom light cut outs by request. To protect the vulnerable and irreplaceable rear quarter panels of your Land Cruiser Prado, this bumper is available with optional tubing side hoops that help push your Prado away from trees and other obstacles.
We finished this bumper off with optional single and dual swing out carriers, a high clearance hitch receiver and heavy duty 9/16″ recovery points that are placed directly in line with the Toyota Prado 90 frame to eliminate any leveraging effects. These recovery points are formed out of laser cut steel plates that pass through the bumper shell and tie directly into the bumper’s main mounting points on the Toyota Prado frame. The recovery points then get welded to the in and outside of the bumper shell. These factors all combine to form recovery points that minimize stress on your Toyota Prado frame and provide reliable recoveries of heavily loaded vehicles in the worst of offroad situations. This bumper comes at very reasonable weights of 112lbs for the steel bumper and 55lbs for the aluminum version. Considering that this bumper replaces your factory bumper, hitch receiver and associated components, the resulting weight increase to your Toyota Prado is surprisingly minimal. This reduces added stress on your vehicle, maintains precious payload capacity, and allows you to keep your factory suspension if desired.
The swing out tire carrier comes in either a single or dual sided configuration and is built to accept a tire up to 37″ in diameter! Both carriers include mounting brackets for a hilift jack and other recovery items. The dual swing out includes the hilift mount as well as a lockable jerry can holder designed to fit two 20L NATO style jerry cans. These carriers feature heavy duty chromoly heim joint hinges, 2000lb toggle latches, T-handle spring pins, and a replaceable UHMW catch pad that provides secure, rattle free operation. The heim joints in conjunction with the toggle latch provide tons of adjustability, allowing for easy assembly and guaranteed alignment of the carrier latch. The single swing out add-on weighs 34lbs and the dual swing out add-on with gas can holder weighs 77lbs.
•DIY Weld-together kit – This bumper arrives as precision CNC-laser cut and bent pieces that you then weld together (detailed assembly instructions included)
•CNC-bent plates greatly reduces amount of welding and grinding required by you and makes for a cleaner finished product
•Engineered to provide maximum ground clearance and protection while also complementing the factory body lines
•Heavy duty 3/16″ plate steel construction for maximum offroad strength and durability
•Optional 1/4″ 5052 aluminum construction for a lightweight yet very durable overlanding setup (57lb weight savings)
•Wrap-Around Side Wings – The side wings of the bumper wrap all the way to the rear wheel wells, removing all vulnerable factory plastic parts
•2″ hitch receiver is recessed into the bumper shell for a clean look and further clearance gains (While the hitch is very well reinforced, we cannot rate it for on-road towing due to the DIY welding nature of this kit)
•Mounts to the frame using 12 mounting points
•Reinforced 9/16″ thick clevis mounts allow the use of 3/4″ D-Rings and pull directly off of the frame for confident recoveries of heavily loaded vehicles
•All kits ship as clean, bare metal that is ready to weld out of the box – the Nitrogen laser cutting technology means no cutting edge oxidation and thus easier and stronger welds
•Optional Single and Dual Swing out carriers with spare tire mount, hilift jack mount and locking dual NATO can holder (dual swing out only)
•Integrated LED light mounts in the bumper include slotted mounting tabs that give tons of adjustment to fit a variety of lights

Key specifications
This is a high clearance DIY weld-together rear bumper kit for the (1996-2002) 90 Series Toyota Land Cruiser Prado. It provides total wrap-around protection for the rear of your Land Cruiser and the high clearance design hugs the factory rear crossmember for unbeatable ground clearance and departure angle. Simply put, you can not get any more rear end clearance without cutting the frame and body! This bumper is a direct replacement for the factory rear bumper and also replaces the vulnerable plastic cladding that wraps around the rear corners of the vehicle body. This means that none of the delicate factory plastic is left vulnerable to obstacles on the trail.
The profile of this bumper has been designed with maximum ground clearance and departure angles put first. The bumper sits as high and tight to the rear frame crossmember of the 90 Series Land Cruiser Prado as possible, while the angled side wing faces will smoothly slide over obstacles and ensure you do not get hung up on the trail. The side wings of this bumper provide un-interrupted plate protection that wraps underneath the vehicle and into the vehicle frame. These side wings will take a serious hit without flexing or deflecting into the vehicle body. We know that many Toyota Prado owners want to run oversized tires, which often create interference and rubbing issues with the stock bumper. We have thought ahead and specifically designed these bumper side wings to clear 37″ tires at full suspension compression.
The main section of this bumper is CNC-bent out of a single piece of 3/16″ P&O Steel. This greatly reduces the amount of welding and grinding required by you and makes for a cleaner finished product. If you are paying to have the bumper assembled by a welding shop, this significantly lowers the cost.
The bumper comes standard with 3×3″ LED pod mount light cut outs that sit just outboard of the recovery points, giving them a much more effective light spread as well as keeping them out of harms way. This includes adjustable slotted mounting tabs that are integrated into the interior of the bumper behind each light opening, allowing for tons of adjustment to fit a wide variety of lights. We can also do custom light cut outs by request. To protect the vulnerable and irreplaceable rear quarter panels of your Land Cruiser Prado, this bumper is available with optional tubing side hoops that help push your Prado away from trees and other obstacles.
We finished this bumper off with optional single and dual swing out carriers, a high clearance hitch receiver and heavy duty 9/16″ recovery points that are placed directly in line with the Toyota Prado 90 frame to eliminate any leveraging effects. These recovery points are formed out of laser cut steel plates that pass through the bumper shell and tie directly into the bumper’s main mounting points on the Toyota Prado frame. The recovery points then get welded to the in and outside of the bumper shell. These factors all combine to form recovery points that minimize stress on your Toyota Prado frame and provide reliable recoveries of heavily loaded vehicles in the worst of offroad situations. This bumper comes at very reasonable weights of 112lbs for the steel bumper and 55lbs for the aluminum version. Considering that this bumper replaces your factory bumper, hitch receiver and associated components, the resulting weight increase to your Toyota Prado is surprisingly minimal. This reduces added stress on your vehicle, maintains precious payload capacity, and allows you to keep your factory suspension if desired.
The swing out tire carrier comes in either a single or dual sided configuration and is built to accept a tire up to 37″ in diameter! Both carriers include mounting brackets for a hilift jack and other recovery items. The dual swing out includes the hilift mount as well as a lockable jerry can holder designed to fit two 20L NATO style jerry cans. These carriers feature heavy duty chromoly heim joint hinges, 2000lb toggle latches, T-handle spring pins, and a replaceable UHMW catch pad that provides secure, rattle free operation. The heim joints in conjunction with the toggle latch provide tons of adjustability, allowing for easy assembly and guaranteed alignment of the carrier latch. The single swing out add-on weighs 34lbs and the dual swing out add-on with gas can holder weighs 77lbs.
•DIY Weld-together kit – This bumper arrives as precision CNC-laser cut and bent pieces that you then weld together (detailed assembly instructions included)
•CNC-bent plates greatly reduces amount of welding and grinding required by you and makes for a cleaner finished product
•Engineered to provide maximum ground clearance and protection while also complementing the factory body lines
•Heavy duty 3/16″ plate steel construction for maximum offroad strength and durability
•Optional 1/4″ 5052 aluminum construction for a lightweight yet very durable overlanding setup (57lb weight savings)
•Wrap-Around Side Wings – The side wings of the bumper wrap all the way to the rear wheel wells, removing all vulnerable factory plastic parts
•2″ hitch receiver is recessed into the bumper shell for a clean look and further clearance gains (While the hitch is very well reinforced, we cannot rate it for on-road towing due to the DIY welding nature of this kit)
•Mounts to the frame using 12 mounting points
•Reinforced 9/16″ thick clevis mounts allow the use of 3/4″ D-Rings and pull directly off of the frame for confident recoveries of heavily loaded vehicles
•All kits ship as clean, bare metal that is ready to weld out of the box – the Nitrogen laser cutting technology means no cutting edge oxidation and thus easier and stronger welds
•Optional Single and Dual Swing out carriers with spare tire mount, hilift jack mount and locking dual NATO can holder (dual swing out only)
•Integrated LED light mounts in the bumper include slotted mounting tabs that give tons of adjustment to fit a variety of lights
Key specifications
-
David Beaudet
-
Phillip Miller (ZomBud)
-
Gerry B
-
Eric T